I stumbled across an article on lobste.rs that spoke about permacomputing which interested me initially because I’d never heard of it.
As the website suggests the principles are a good place to start.
In particular the lifespan maximization approach resonated with me, here’s an excerpt:
Lifespan maximization is the extension of hardware lifespan by the users. It may be supported by planned longevity from the manufacturer’s side, but it rarely is.
Fabrication of microchips requires large amounts of energy, highly refined machinery and poisonous substances. Because of this sacrifice, the resulting microchips should be treasured like gems or rare exotic spices. Their active lifespans should be maximized, and they should never be reduced to their raw materials until they are thoroughly unusable.
Broken devices should be repaired. If the community needs a kind of device that does not exist, it should preferrably be built from existing components that have fallen out of use. Chips should be designed open and flexible, so that they can be reappropriated even for purposes they were never intended for.
It got me thinking about the loose long-term plan to migrate my various bits of home software over to a self-hosted Raspberry Pi Kubernetes cluster.
I walked into my local electronics store maybe 6 months ago with the goal of buying 4 top-of-the-line Raspberry Pis and everything I needed and go get stuck in; however I was informed that there was a Raspberry Pi shortage and the limit was 1 per customer- I went again the other week and was told there simply were none to be bought and they didn’t know when they’d be back in stock.
Truly we are in unprecedented times.
Recycling
Energized by that particular principle from permacomputing and enforced by the chip shortage, I dug through my shed for all the old Raspberry Pis I’ve accumulated over the years and took stock:
- 1 x Raspberry Pi 3 Model B Plus Rev 1.3
- 3 x Raspberry Pi 3 Model B Rev 1.2
- 1 x Raspberry Pi 2 Model B v1.1
- 1 x Raspberry Pi 2011.12
I figured I could probably just ignore the Pi 2 and Pi leaving me with a nice round 4 x Pi 3s to work with; here are the specs of note:
- ARM64
- 4-core Cortex-A53
- 1200 - 1400 MHz peak pending revision
- 1 GB RAM
In further keeping with the theme, I had a mixture of old external HDDs and SSDs lying around that I figured I could try to turn into some distributed storage.
Based on frankly not much science and mostly a balance between things I already knew and things I wanted to learn to benefit my professional life, here’s the stack I chose:
Learnings
I learned a bunch of things about my existing environment and this hardware and software stack:
/boot/network-config.txtdidn’t seem to seed thenetplanstuff as desired- Practically this meant I couldn’t do headless installations and needed a screen and keyboard to configure
netplanonce booted
- Practically this meant I couldn’t do headless installations and needed a screen and keyboard to configure
- Hacking up
/etc/hostsis a pain and I should have properly set up my local DNS server - I needed to disable / uninstall a bunch of services to maximise the amount of resources available to Kubernetes
ModemManager.serviceunattended-upgrades.servicesnapd.servicemultipathd.servicenetworkd-dispatcher.servicebluetooth.servicesnapd.servicesnapd.seeded.servicesnap.lxd.activate.service
- I needed
cgroup_enable=cpuset cgroup_enable=memory cgroup_memory=1at/boot/firmware/cmdline.txt - I needed to install
linux-modules-extra-raspito enable VXLAN support - Because I type quickly with extremely poor accuracy, uninstalling
command-not-found python3-commandnotfoundsaved a bunch of time that I would otherwise have spent waiting for Python to spin up and tell me “hey, command not found pal”- This is really only an issue on slow devices- a serious machine gives you a response nice and quickly
- All my SD cards were too slow for the amount of disk IO that the k3s server wanted to do
- Moving
/var/logtotmpfsdidn’t help that much, I think the issue was the SQLite database - Moving
/var/lib/rancherto an external USB drive helped but not enough
- Moving
- Despite needing the RAM, I should have mounted
/var/logtotmpfs- I lost 2 of the 4 Raspberry Pis to exhausted SD cards in less than a week (both the same sort of SD card though interestingly)
Which leads in to my final and most significant learning:
- It can’t be done
Well that’s not really true, here’s a truer statement:
- It can’t be done if you want to also run a Rook Ceph cluster
I basically couldn’t get any of the pods to be happy because everything was timing out all the time; load average was through the roof despite CPU usage not being really that high (suggesting storage was the bottleneck), one of the various Ceph concepts kept running out of memory regardless how I configured it.
Perhaps “it can’t be done” is a bit too defeatist but a common theme I’ve found over the years is that the universe or the god of computers of whoever is in charge finds initially subtle and then less subtle ways to let me know I’ve taken a wrong turn.
I had one final attempt to give the Raspberry Pis their best chance by moving the k3s server onto an x86 machine and just having the Raspberry Pis run as agents- still no dice.
Time for plan B
It wouldn’t be a home project without completely falling apart and causing me to lose hours and hours on aspects I hadn’t counted on exploring; how can I recover this effort and continue to learn about Kubernetes while honouring the Permacomputing approach?
With old laptops of course! I tracked down the following:
- My old Asus G55VW which had been sitting on a bench at work for years
- My old MacBook Pro Late 2013 which I had factory reset and left on a shelf
- My wife’s old Asus K43e which was stuffed in a drawer in the TV cabinet
- I had hoped to include my old Alienware M11x R3 but I think one of my coworkers has turned it into a crypto wallet
My plan was to couple these laptops with the HP ProLiant MicroServer Gen8 that a coworker gave to me after he migrated our work servers onto some new big flashy servers along with the 4 x Raspberry Pi 3s and build a kind of Beowulf cluster.
Migration approach
The old HP server was already running some piecemeal services as Docker containers or natively:
- Docker
- Nginx to provide my home landing page and some proxying around my services
- Eclipse Mosquitto as my MQTT broker
- Home Assistant for everything (this is an incredibly good and flexible free piece of software)
- Pi-Hole as a local DNS server
- Samba to provide a Windows file share for my scanner to upload to (it’s that or give it an email account)
- Cameranator which is my home-grown CCTV system (Motion, ffmpeg, Hasura and Postgres all glued together with some Go of course)
- Native
- A subset of my home-grown mqtt_things that plug into Home Assistant via Mosquitto
Ideally I’d like to be able to run all of those services on Kubernetes, but I also want the migration to be as seamless as possible for my users (my wife, who provides me with helpful feedback about our home automation journey such as “I preferred it when I could just turn the light on using the switch on the wall”).
With that in mind, my rough plan looked like this:
- Get k3s running on all 8 nodes
- Use Rook Ceph to turn my old external hard drives into distributed storage
- Migrate all my services over to Kubernetes without losing any data (except for the rolling 4TB of CCTV footage, I don’t care about that, I figure with few exceptions historic CCTV footage really only needs to be kept long enough to be able to refer to after an incident)
There were a few constraints and challenges to manage along the way:
- It will take me a while to migrate everything, so Kubernetes and my legacy stack must coexist
- This means I can’t run a Kubernetes load balancer on the HP server until I’m ready
- Cameranator needs (or least benefits from) access to GPUs (which I have access to with the HP server and some of the laptops)
- This means I’ll need to manage drivers at the host level and figure out how to expose the GPU at the Kubernetes level
- One of the
mqtt_thingsinstances runs my sprinklers and needs to be plugged into an Arduino via USB serial port- This means I’ll need to expose that serial port to Kubernetes and also control which node this thing runs on
- A recent change to my home ISP has seen port 80 and port 443 blocked on my external IP
- I’ve used this as an excuse to play with Cloudflare
- I don’t want to have to refactor any of the software I’ve written
- This is a pretty artificial limitation, but I struggle to find spare time as it is and I want to dedicate all of that spare time to learning Kubernetes in the short term, so I don’t want to be distracted by refactoring my software to better fit Kubernetes
End state diagrams and photos for the impatient
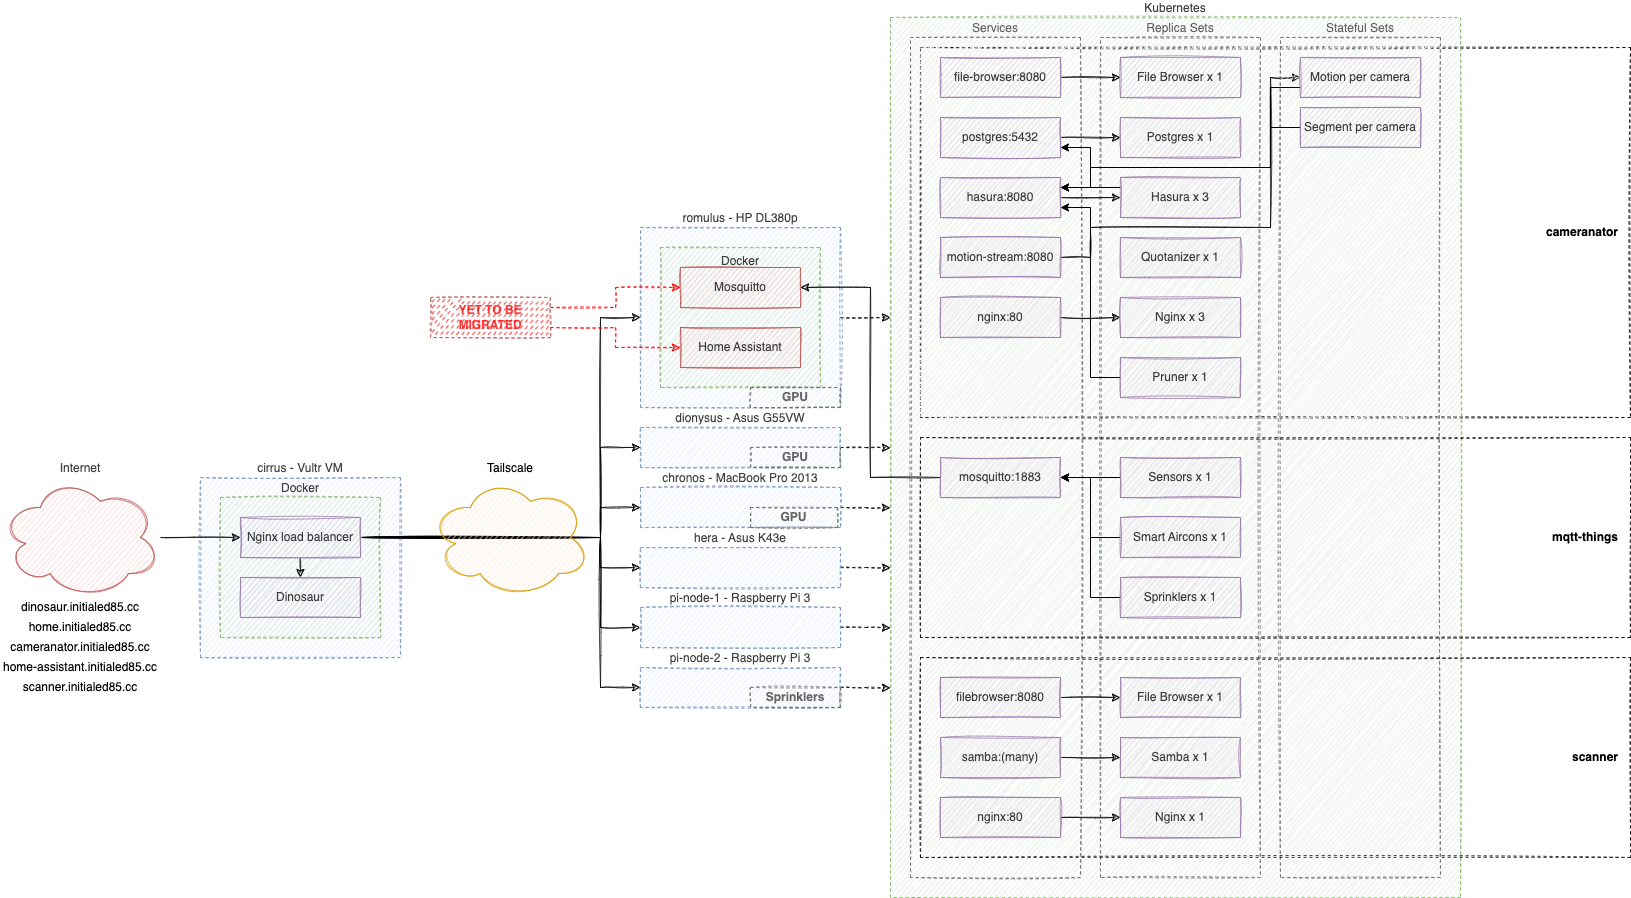
Here’s a bit of a logical overview of how everything is shipped:
Here’s most of the computer cluster sitting next to my TV:

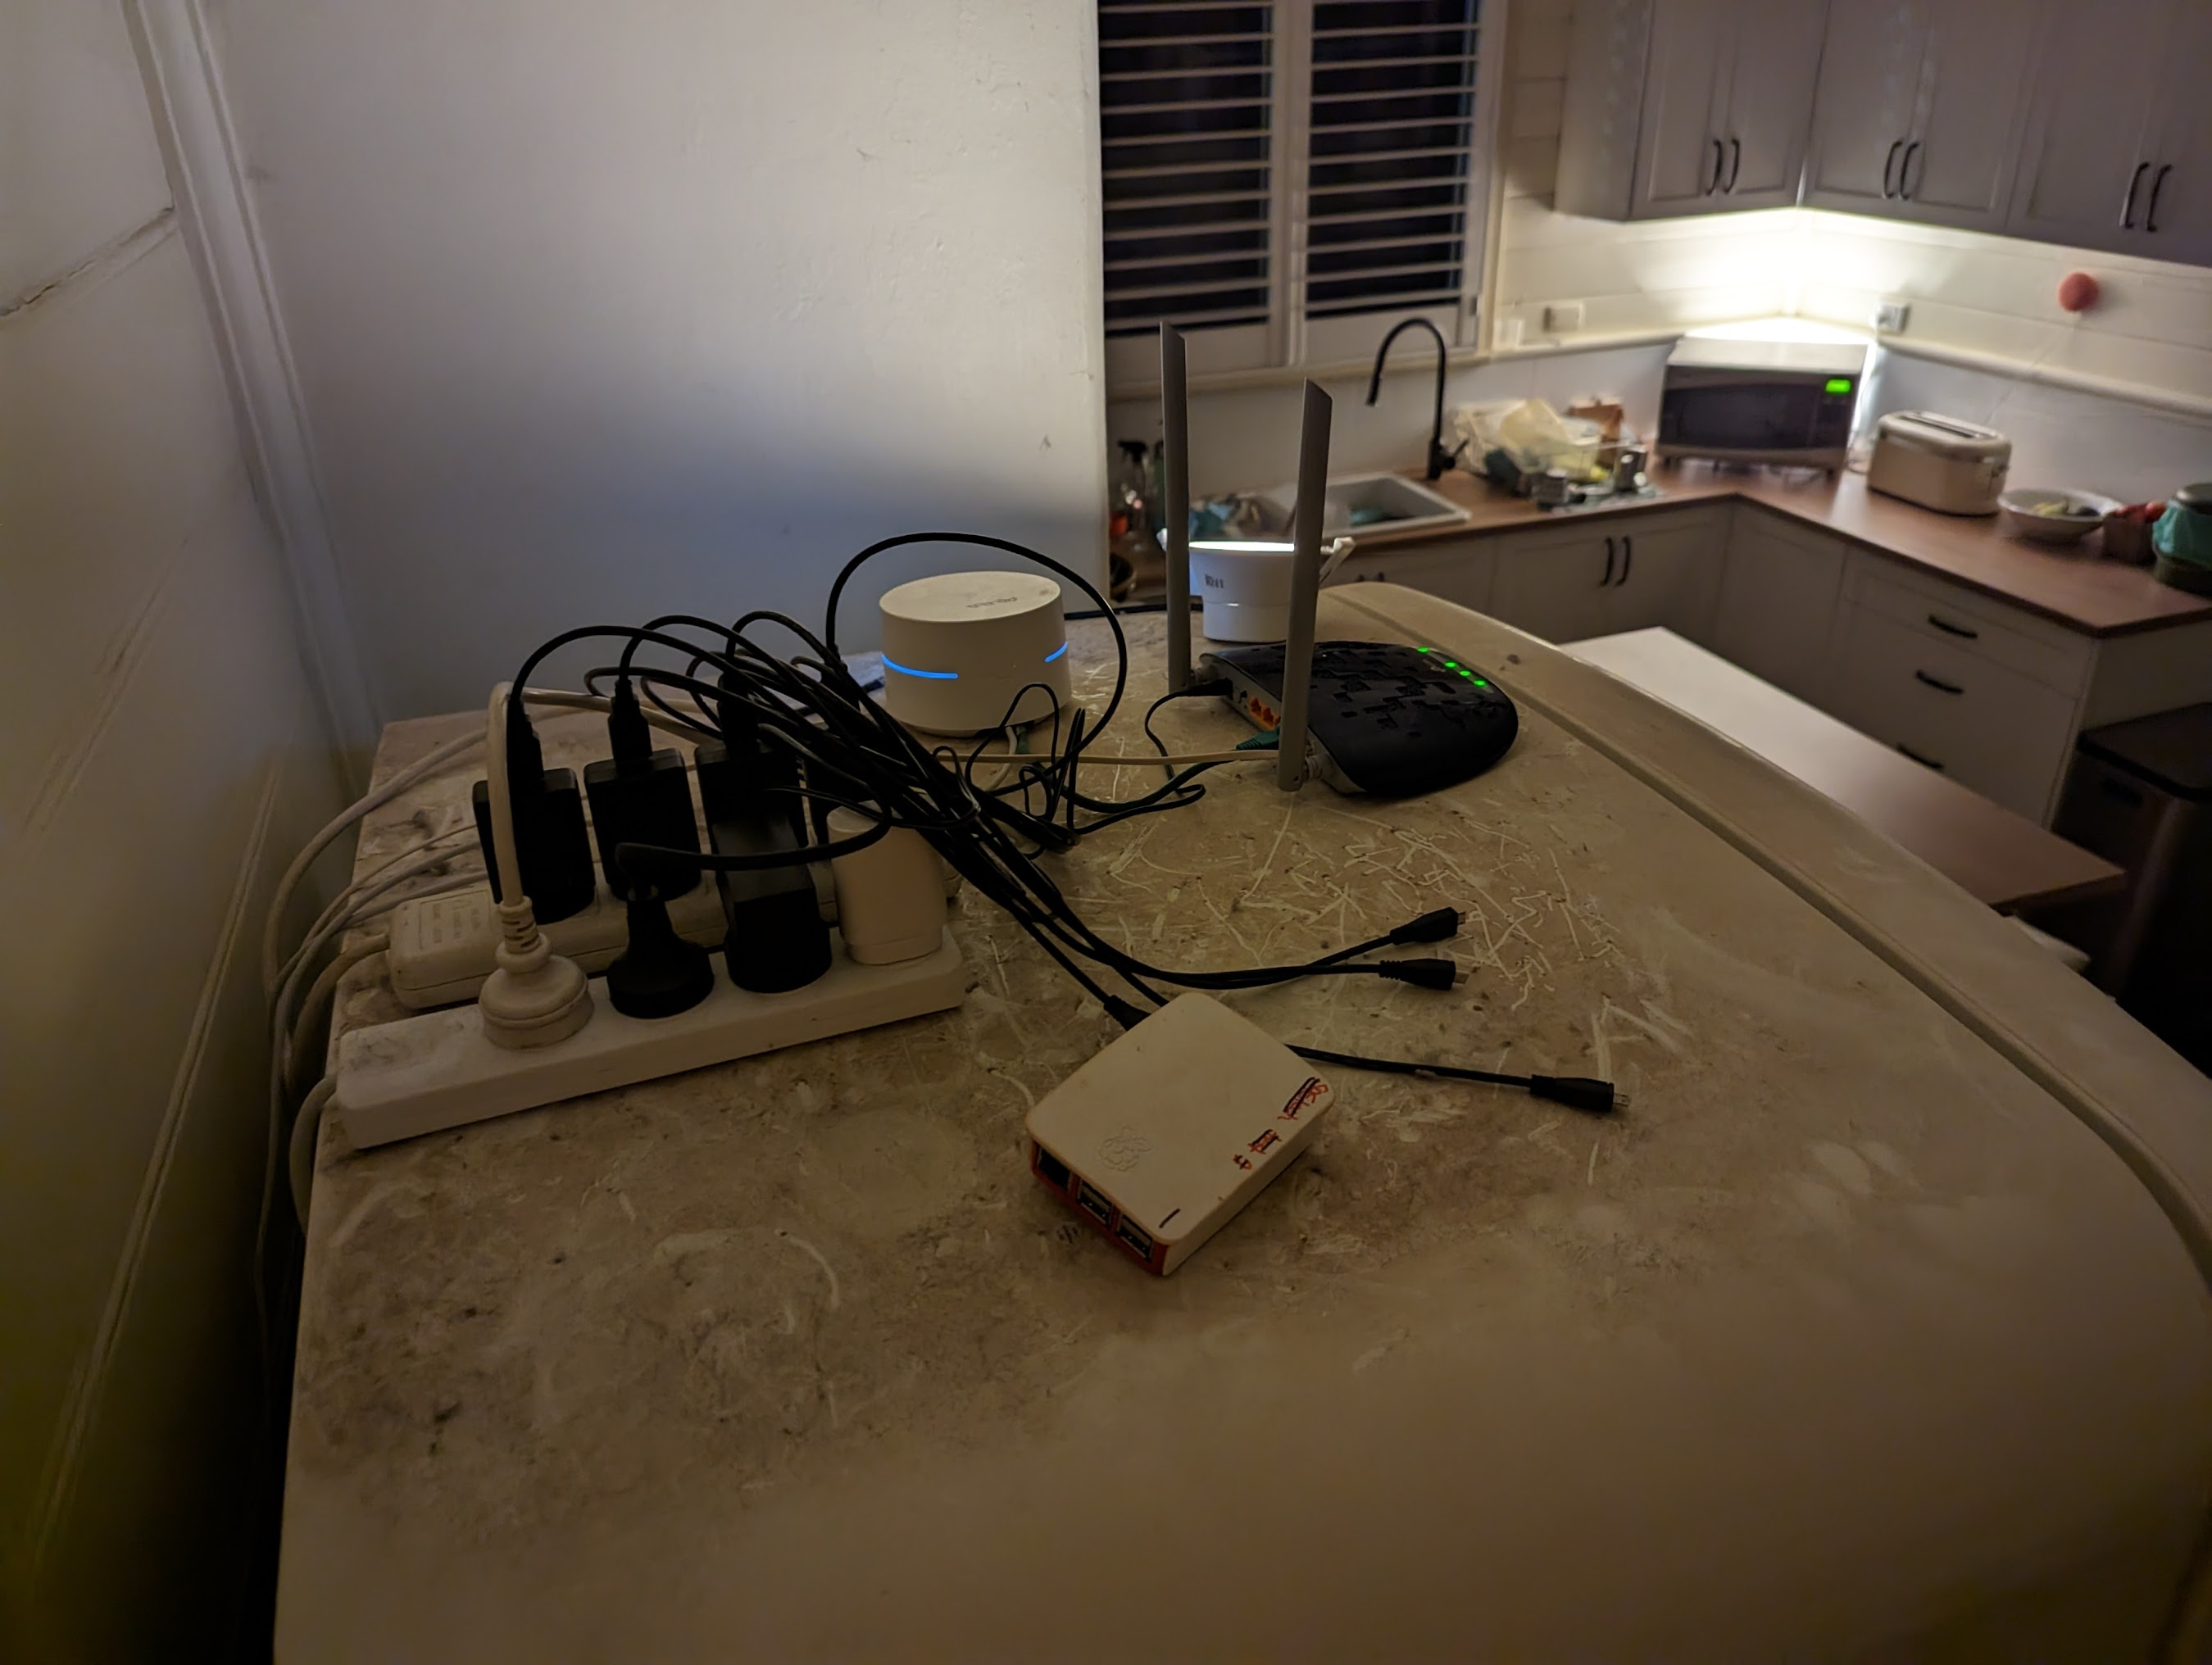
Here’s 1 of the 2 remaining Raspberry Pis on top of my fridge along with my WAN link:
And here’s the other Raspberry Pi in a box outside (attached to the Arduino for the sprinklers:

Yes, it’s all very slapped together and very dusty but hey, this is a personal project- if I do it properly it’s too much like work ;)
The snippets of relevance
I’m not gonna go into a great level of detail because it would be pages and pages and honestly I didn’t write enough of it down, so I’ll include just the parts that took me a bit of time and therefore may be of use to somebody.
Single-server multi-agent k3s cluster with no load balancer on the server
I pre-downloaded the k3s install script referred to here so I could reuse it as I had a feeling I’d be starting from scratch a lot:
curl -sfL https://get.k3s.io > k3s-install.sh && chmod +x k3s-install.sh
The following spins up a k3s node as a server with the kubeconfig file ready to be accessed by any user:
./k3s-install.sh --write-kubeconfig-mode 644 --node-label svccontroller.k3s.cattle.io/enablelb=false
You can dump out the token needed to join k3s agents to the k3s server with the following:
sudo cat /var/lib/rancher/k3s/server/node-token
And then (assuming you’ve downloaded the install script) you can install the k3s agent and join it to your k3s server as follows:
export K3S_TOKEN="(some big long token)"
export K3S_URL="https://(your-server-hostname):6443"
./k3s-install.sh --node-label svccontroller.k3s.cattle.io/enablelb=true
Unrestricted use of a GPU in Kubernetes
I lost a lot of time to this one; in theory if you have the drivers installed on the host, you should just be able to deploy the NVIDIA device plugin and away you go- this was not my experience, I’m not sure if this was because of my old GPUs or because of k3s, but I’ll cover what did work for me.
As context, I wanted to use my GPUs for transcoding tasks and NVIDIA apply an arbitrary limit on concurrent transcoding sessions for some reason; fortunately some clever individual maintains a tool to patch the drivers that removes that concurrency limit.
Here are the GPUs I’ve got and the NVIDIA drivers I can run on them:
- Quadro P400
in the HP ProLiant MicroServer Gen8
- Supported by 515.76 but probably the more recently released ones too
- NVIDIA GeForce GTX 660M in the Asus G55VW
- No support beyond 470.141.03
- NVIDIA GeForce GT 650M in the MacBook Pro Late 2013
- No support beyond 470.141.03
So, first I installed those drivers, which was basically a case of the following:
sudo bash ./NVIDIA-Linux-x86_64*.sh
I opted for no DKMS, no 32-bit support and basically no frills- I don’t have strong reasons for this, but it has been the most reliable for me on the HP server from back when I was running this workload in Docker (worst case you bump your kernel version and have to reinstall the drivers, after restarting on the new kernel).
Anyway, I then cloned keylase/nvidia-patch and ran the following:
sudo bash ./patch.sh
In theory now at least at the host level, I have full unrestricted access to my GPUs; to get things working in Kubernetes I
followed the prerequisites for the Nvidia device plugin, I skipped
making any changes to containerd because k3s seems to do that for you and then I attempted
to deploy the plugin without success- it kept insisting it
couldn’t find any GPUs.
Fortunately I found a comment on a k3s issue that worked out of the box; I skipped past the setup steps (as that was all sorted) and put together a modified version of hansaya ’s YAML
You can find my modified version as a GitHub Gist; the summary of the modifications are:
- Remove the benchmark
- Add a label requirement (so that discovery won’t happen on nodes unless you label them as
gpu=yes)- This somewhat defeats the purpose of discovery, but I found the discovery pods just kept crash looping on my non-GPU nodes (both x86 and ARM)
So if your host has a happy GPU, you can run the following to make it available to Kubernetes:
kubectl apply -f https://gist.githubusercontent.com/initialed85/cd8b268b7cad2ca8f991b4087cbbf57a/raw/756335bd68e793e34e56f56dbaff636b8a5cf4e9/nvidia-device-plugin.yml
There was another significant gotcha that took me a while to figure out in that somehow my GPUs seemed to be declared as less than 1 GPU per GPU from a resource limits perspective- I had 3 GPUs and 3 pods that needed to do GPU work, if I had each pod ask for 1 GPU, I wouldn’t get more than 1 or 2 happy pods.
I worked around this with a combination of (unconfirmed how much is required):
- Don’t use resource limits
- Lean on the same
gpu=yeslabel to lock pods to my GPU nodes - Specify
runtimeClassName: nvidiaat the pod level - Specify the environments
NVIDIA_VISIBLE_DEVICES=allandNVIDIA_DRIVER_CAPABILITIES=allat the container level
With this I was comfortably able to run 6 pods doing GPU work (3 x Motion, 3 x ffmpeg) across 3 different nodes concurrently; additionally, each of those pods is actually made up of 2 containers that use GPU, a primary container that generates video (Motion or events, ffmpeg for segments) and a secondary container that processes video into a low-res variant, so at any given time there are potentially 12 concurrent pieces of GPU work being done aross my cluster (though the reality is Motion events are sparse, so it’s more like 6 - 9 concurrent pieces of GPU work).
Thought: Do I even need the NVIDIA device plugin if I’m handling node selection myself? Who knows, it’s working, I’m worried I’ll break it.
Deploying a Rook Ceph storage cluster for use by Kubernetes
I had initially wanted to try and deploy Ceph natively using cephadm but boy is it complex; a bit of Googling led me to Rook Ceph and I have not looked back, it’s just so good.
The key element that took me the longest to work out is that your drives need to be truly empty before Ceph will consume them; you can achieve this as follows:
# WARNING: be super, super sure you've got the right device path- double-check your fdisk -l and dmesg
sudo sgdisk -Z /dev/sdX
In some cases you may have to run it twice, or at least I had to run it twice to make it say happy sounding disk things back at me.
Anyway, assuming you’ve now prepared your drives, the key takeaways to get a Rook Ceph cluster going are something like:
- Need to install
lvm2on the host first - Need at least 3 nodes
Then I just followed the quickstart guide and made heavy use of their example repo with minimal tweaks to suit me; as a brief summary that should not just paste into your console without your own investigation:
git clone --single-branch --branch v1.10.3 https://github.com/rook/rook.git

cd rook/deploy/examples
kubectl create -f crds.yaml -f common.yaml -f operator.yaml

# keep checking this until rook-operator is in running state
kubectl -n rook-ceph get pod

# now deploy the cluster
kubectl create -f cluster.yaml
It takes quite a while for everything to get to a steady state; eventually you should have a stack of pods, if you’ve OSDs (not just the prepare OSD pods) that are happy then you’re good:
$ kubectl -n rook-ceph get -o wide pods | grep osd | sort
rook-ceph-osd-0-59bf5d8c6c-qr9kn                     1/1     Running     7 (23h ago)     6d13h   10.42.0.66        romulus     <none>           <none>
rook-ceph-osd-1-54dd746978-hpvjm                     1/1     Running     6 (23h ago)     6d13h   10.42.2.225       dionysus    <none>           <none>
rook-ceph-osd-2-699bb5d4bf-296g2                     1/1     Running     6 (23h ago)     4d11h   10.42.1.10        chronos     <none>           <none>
rook-ceph-osd-4-6b696fc987-ns22p                     1/1     Running     2 (2m28s ago)   27h     10.42.3.143       hera        <none>           <none>
rook-ceph-osd-prepare-chronos-hwj92                  0/1     Completed   0               3m22s   10.42.1.35        chronos     <none>           <none>
rook-ceph-osd-prepare-dionysus-ztscc                 0/1     Completed   0               3m10s   10.42.2.241       dionysus    <none>           <none>
rook-ceph-osd-prepare-hera-zlvs5                     0/1     Completed   0               3m13s   10.42.3.152       hera        <none>           <none>
rook-ceph-osd-prepare-pi-node-1-fq6fr                0/1     Completed   0               3m16s   10.42.5.72        pi-node-1   <none>           <none>
rook-ceph-osd-prepare-pi-node-2-gm89w                0/1     Completed   0               3m19s   10.42.4.81        pi-node-2   <none>           <none>
rook-ceph-osd-prepare-romulus-q4bqq                  0/1     Completed   0               3m26s   10.42.0.102       romulus     <none>           <none>
I then followed the guide for deploying a shared filesystem and associated storage class which boiled down to:
cd rook/deploy/examples
kubectl create -f filesystem.yaml

# wait for the MDS pods
kubectl -n rook-ceph get pod -l app=rook-ceph-mds

# deploy the storage class
kubectl create -f csi/cephfs/storageclass.yaml
At this point you’re in a position to make a persistent volume claim against the storage class; something like this:
apiVersion: v1
kind: PersistentVolumeClaim
metadata:
  name: cameranator-pvc
  namespace: cameranator
spec:
  accessModes:
    - ReadWriteMany
  resources:
    requests:
      storage: 1T
  storageClassName: rook-cephfs
  volumeMode: Filesystem
And then to make use of that in a pod you’ll want something like this:
apiVersion: apps/v1
kind: Deployment
metadata:
  namespace: cameranator
  name: postgres-deployment
  labels:
    app: postgres
spec:
  replicas: 1
  selector:
    matchLabels:
      app: postgres
  template:
    metadata:
      labels:
        app: postgres
    spec:
      volumes:
        - name: shared-volume
          persistentVolumeClaim:
            claimName: cameranator-pvc
            readOnly: false
      containers:
        - name: postgres
          image: postgres:12
          volumeMounts:
            - name: shared-volume
              subPath: postgres-volume/var/lib/postgresql/data
              mountPath: /var/lib/postgresql/data
          env:
            - name: POSTGRES_PASSWORD
              valueFrom:
                configMapKeyRef:
                  name: postgres-config-map
                  key: POSTGRES_PASSWORD
          ports:
            - containerPort: 5432
That’s basically it; check out the Kubernetes stuff for Cameranator to see it all.
Using a stateful set for DRY while allocating different configs per replica
I’ve got 3 CCTV cameras, 3 GPU nodes and 4-ish concurrent pieces of GPU work per CCTV camera that I need doing- I definitely want to be able to balance that work across my GPU nodes; as far as I could tell, within the limitations of my software architecture I had 3 options:
- Manually describe 3 different deployments, one for each CCTV
camera
- This is pretty much the opposite of DRY and invites a fair bit user error as things drift
- Have something like Helm do that for me
- Then at least I’ll only have one gross templated deployment full of random symbols stupid intendation (essentially breaking the human facing interface in order to retain the human-facing interface for the non-human side of something that consume YAML)
- Use a stateful set for maximum DRY
- However I’ll need to find a way to allocate a different configmap to a stateful set replica by ordinal
For my money, the 3rd option is the cleanest provided I can make it work- as always happens, some nice person on the internet has a great suggestion for this that I was able to tweak; basically:
- Have a stateful set of the appropriate scale (in my case 3, one replica per CCTV camera)
- Have a config map for each CCTV camera and name each config map in the
same pattern as the stateful set replicas (e.g.
segment-statefulset-0) - Have an init container that mounts all config maps to a fixed location and copies the one that matches the hostname of the init container for this replica into an empty mount at a fixed location
- Have a container that does my actual GPU work and points to the copied config at the fixed location
Because the init container always runs before the actual container and because both have the same hostname pattern (as they’re two different containers on the same pod, so same hostname) we can use this pattern to know which file to copy and place in the fixed location.
Here’s what the heck I am talking about.
It all works a treat:
$ kubectl -n cameranator get -o wide statefulset | grep segment
segment-statefulset   3/3     3d16h   segment-processor,segment-generator   initialed85/cameranator-segment-processor:latest,initialed85/cameranator-segment-generator:latest

$ kubectl -n cameranator get -o wide pod | grep segment
segment-statefulset-2                     2/2     Running   0              23h     10.42.2.237   dionysus   <none>           <none>
segment-statefulset-1                     2/2     Running   0              23h     10.42.0.96    romulus    <none>           <none>
segment-statefulset-0                     2/2     Running   0              23h     10.42.1.25    chronos    <none>           <none>

$ kubectl -n cameranator exec -it segment-statefulset-0 -c segment-generator -- bash -c "ps aux | grep ffmpeg | grep -v grep"
root        3010 14.2  1.2 21659692 100932 ?     Sl   13:43  84:55 ffmpeg -hwaccel cuda -c:v h264_cuvid -rtsp_transport tcp -i rtsp://192.168.137.31:554/Streaming/Channels/101 -c copy -map 0 -f segment -segment_time 300 -segment_format mp4 -segment_atclocktime 1 -strftime 1 -x264-params keyint=100:scenecut=0 -g 100 -muxdelay 0 -muxpreload 0 -reset_timestamps 1 -c:v h264_nvenc /srv/target_dir/segments/Segment_%Y-%m-%dT%H:%M:%S_Driveway.mp4

$ kubectl -n cameranator exec -it segment-statefulset-1 -c segment-generator -- bash -c "ps aux | grep ffmpeg | grep -v grep"
root          14  9.6  1.3 9451976 212496 ?      Sl   00:34 133:13 ffmpeg -hwaccel cuda -c:v h264_cuvid -rtsp_transport tcp -i rtsp://192.168.137.32:554/Streaming/Channels/101 -c copy -map 0 -f segment -segment_time 300 -segment_format mp4 -segment_atclocktime 1 -strftime 1 -x264-params keyint=100:scenecut=0 -g 100 -muxdelay 0 -muxpreload 0 -reset_timestamps 1 -c:v h264_nvenc /srv/target_dir/segments/Segment_%Y-%m-%dT%H:%M:%S_FrontDoor.mp4

$ kubectl -n cameranator exec -it segment-statefulset-2 -c segment-generator -- bash -c "ps aux | grep ffmpeg | grep -v grep"
root          13  8.6  1.1 21660656 92312 ?      Sl   00:33 119:28 ffmpeg -hwaccel cuda -c:v h264_cuvid -rtsp_transport tcp -i rtsp://192.168.137.33:554/Streaming/Channels/101 -c copy -map 0 -f segment -segment_time 300 -segment_format mp4 -segment_atclocktime 1 -strftime 1 -x264-params keyint=100:scenecut=0 -g 100 -muxdelay 0 -muxpreload 0 -reset_timestamps 1 -c:v h264_nvenc /srv/target_dir/segments/Segment_%Y-%m-%dT%H:%M:%S_SideGate.mp4
It’d be nice if there was some sort of simple API for storing configs that had a stack-like interface; know how many configs you’ve got, know how many replicas you need, each replica’s config is the same, they hit the API and pop a config and all is well.
Some common routing patterns with Traefik
The default ingress controller for k3s is Traefik and as an Nginx guy, I dunno how I feel about it; here’s what I can tell:
- Documentation is vast and complex yet useless and lacks good examples
- Community is so-so (hard to find good examples)
- It seems to get the job done
Match on a subdomain and subpath
In my case cameranator.initialed85.cc/filebrowser needs to go to filebrowser/filebrowser:
apiVersion: traefik.containo.us/v1alpha1
kind: IngressRoute
metadata:
  namespace: cameranator
  name: filebrowser-ingressroute
spec:
  routes:
    - match: HostRegexp(`{subdomain:cameranator}.{any:.*}`) && PathPrefix(`/filebrowser`)
      kind: Rule
      services:
        - name: filebrowser
          port: 8080
Match on a subdomain and subpath but strip the subpath before proxying
In my case cameranator.initialed85.cc/api needs to go to hasura:
---
apiVersion: traefik.containo.us/v1alpha1
kind: Middleware
metadata:
  namespace: cameranator
  name: hasura-middleware-stripprefix
spec:
  stripPrefix:
    prefixes:
      - /api
---
apiVersion: traefik.containo.us/v1alpha1
kind: IngressRoute
metadata:
  namespace: cameranator
  name: hasura-ingressroute
spec:
  routes:
    - match: HostRegexp(`{subdomain:cameranator}.{any:.*}`) && PathPrefix(`/api`)
      kind: Rule
      middlewares:
        - name: hasura-middleware-stripprefix
      services:
        - name: hasura
          port: 8080
Accessing an Arduino via USB serial port
This one is pretty easy to be honest; you just describe a volume with a hostPath specified and then mount it to a container as you would
anything.
Additionally, because there’s only one node that has the Arduino plugged in, I added a label of iot-role=sprinklers to that node and used
at as a nodeSelector in my deployment.
Exposing a non-Kubernetes service as a Kubernetes service
To ease my migration path, I wanted to keep using my non-Kubernetes MQTT broker until I’m ready to cut it over; this is also very easy.
You declare a service as you would for anything but you don’t set any selectors; then you manually declare an endpoint and point it at your non-Kubernetes service and boom, you can hit that thing from anyhwere in your cluster using Kubernetes DNS semantics and plus when you’re ready to cut it over, you don’t have to change anything that’s pointing to it as that interface stays the same.
Here’s the scoop:
---
apiVersion: v1
kind: Service
metadata:
  namespace: mqtt-things
  name: mqtt-broker
spec:
  ports:
    - protocol: TCP
      port: 1883
      targetPort: 1883
---
apiVersion: v1
kind: Endpoints
metadata:
  namespace: mqtt-things
  name: mqtt-broker
subsets:
  - addresses:
      - ip: 192.168.137.253
    ports:
      - port: 1883
Multi-arch Docker builds
This one enables me to ship my MQTT stuff either to my x86 or my ARM nodes (except for the Arduino-reliant workload of course); it’s pretty straightforward:
#!/usr/bin/env bash

set -e

docker buildx create --use --name mqtt_things

function cleanup() {
  docker buildx rm mqtt_things || true
}
trap cleanup EXIT

function build() {
  _=${1?:first argument must be CMD_NAME}
  _=${2?:second argument must be Docker image name part}

  docker buildx build \
    --platform linux/amd64,linux/arm64 \
    --build-arg CMD_NAME="${1}" \
    -f docker/cli/Dockerfile \
    -t "initialed85/mqtt-things-${2}:latest" \
    --push \
    .
}

build "sensors_cli" "sensors-cli"
build "smart_aircons_cli" "smart-aircons-cli"
build "sprinklers_cli" "sprinklers-cli"
Deploying, pushing to and pulling from a private Docker registry
Until this point I had just been using my free tier Docker Hub repositories but eventually I needed to deploy my landing page Nginx container which has some baked in credentials; the logical choice is to run a private registry.
First, I needed to literally ship the private registry- fortunately there’s a great example as part of the Rook Ceph documentation that of course uses the storage cluster; I made a slight variation that includes an external port 5000 presence.
kubectl create -f https://gist.githubusercontent.com/initialed85/1db5af337fed4ad9784fee725f551fb5/raw/e9ea67134b6a4bb9ae3257edb9eb1503937ff100/kube-registry.yaml
Then you’ll need to modify your build machine’s /etc/hosts to look a bit like this (replacing the IP with one of your node IPs of course):
192.168.137.253 kube-registry
And modify your build machine’s Docker daemon.json or MacOS preference menu equivalent like this:
{
  "insecure-registries": [
    "kube-registry:5000"
  ]
}
Ensure on each of your nodes you have a file at /etc/rancher/k3s/registries.yaml that reads as follows:
mirrors:
  "kube-registry:5000":
    endpoint:
      - "http://kube-registry:5000"
And you’ll also need to edit /ect/hosts on each node to look a bit like this (replacing the IP with that node’s IP of course):
192.168.137.253 kube-registry
Finally you’re set up to have a build script that looks like this:
#!/usr/bin/env bash

set -e -x

pushd "$(pwd)"

docker build \
  -t kube-registry:5000/nginx-router:latest \
  -f ./Dockerfile \
  .

docker push kube-registry:5000/nginx-router:latest
And a deployment that looks like this:
apiVersion: apps/v1
kind: Deployment
metadata:
  namespace: nginx-router
  name: nginx-deployment
  labels:
    app: nginx
spec:
  replicas: 1
  selector:
    matchLabels:
      app: nginx
  template:
    metadata:
      labels:
        app: nginx
    spec:
      containers:
        - name: nginx
          image: kube-registry:5000/nginx-router:latest
          ports:
            - containerPort: 80
Closing thoughts
Honestly, I’m pretty pleased- functionally, my videos are better quality now (having the single HP server do all the recording and transcoding alone seemed to result in weird video artefacts), they load faster now and I think the distributed storage is faster (mixture of SSDs and HDDs) than my dying all-HDD ZFS pool was (fear not, it will live again soon as even more storage given to the storage cluster).
I’ll migrate the other stuff over in the coming weeks, if I come across anything really interesting I’ll write another article.
Probable road map stuff:
- I’d like to try to deploy a multi-master Postgres cluster
- I’ll move the Cameranator DB over to it
- I’ll probably also move Home Assistant over to it
- I guess I should have some IaC
I’ve definitely enjoyed learning about Kubernetes, I think as complex as it is, it’s probably the future.
Stay tuned for 3 months from now when I’m migrating everything to Nomad ho ho ho.